FAQ (frequently asked questions)
How do I replace a toner cartridge?
Replacing the toner in your copier will be necessary. Your device will let you know when it’s time to replace the toner by providing a note on the control panel. It is a quick and easy task that typically only takes a few minutes. Do not attempt to replace the toner cartridge before that point, even if there is a quality issue with the prints. It’s likely that something other than the toner is the cause. (Call your technician if that’s the case.)
Devices vary between manufacturers, so you may need to refer to the owner’s manual that came with your copier in order to answer any specific issues. However, here are the steps you will need to take for replacing any toner cartridge.
Open the toner hatch in your copier. If you are unable to locate the toner hatch, check your copier’s manual for directions.
Pull out the old toner cartridge. Set it aside on a piece of paper or in a box. Toner, though it’s not dangerous, can cause quite a mess if it’s spilled or rubbed onto something. If you get toner on yourself or a surface, try blowing or brushing the toner off rather than wetting it.
Open the new cartridge packaging. Locate the instructions for installation. Roll or shake the cartridge and remove a protective film or cap before installing it in the copier.
Install the new toner cartridge. Close the toner hatch of the copier and print a test copy to ensure that the copier is working.
Dispose of the old cartridge according to any instructions given in the packaging and always consider recycling the cartridge. Visit our cartridge recycling page for links to your respective copier manufacturer.
How do I empty the waste toner?
Every copy produces a small amount of excess toner that does not adhere to the paper and must there for be dealt with. The waste toner bottle included on most devices (but not all) catches that extra toner instead of releasing into the machine where it would cause damage. The waste toner bottle is important, but most will most likely only need to be replaced once during the life of the printer, if at all.
A copier with a waste bottle will only have one, regardless of whether the machine is monochrome or color. Models that require a waste toner bottle will have a sensor that informs the printer when the bottle is full and in turn lets you know via the control panel. Check your manual for the devices warning system so that you recognize it.
Although some toner waste bottles can be manually emptied, we recommend not doing so. Simply order a spare waste bottle and replace it according to your device manufacturers guidelines. The spare bottle will come with a bag. Place the bottle in the bag and call us to have one of the technicians empty it for you. This allows you to have a spare bottle at all times.
How do I edit the address book on my CANON device?

1) Click the “Main Menu” button. On some devices this button may be part of the screen, and on other it may not.
2) Click the “Scan and send” button on the screen.
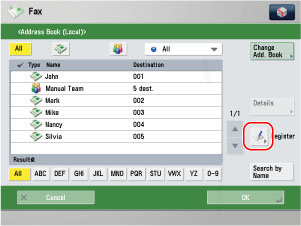
3) Look for the “Address Book” button and select it.
4) Look for the “Register/Edit” button on the right side of the screen and click it.
5) To add a new name/address:
a) Follow steps 1-4 above.
b) Click the “Register new destination” on the right side of the screen
c) In most cases, you will want to include both a name and an email address, so choose “email” from the pop-up menu. (For information on the other menu options, please consult your owner’s manual.)
d) Click inside the “name” box, which will pull up the keyboard screen. Type in the name as you wish it to appear and click “OK”.
e) Select the address book that you want to add it to. The default address book is “Address Book 1”, which is what most people use as their main address book.
f) Click inside the “email” box and add the relevant email address. Click “OK”
6) To edit an existing name/address:
a) Follow steps 1-4 above.
b) On the “Register/Edit” page, select the letter group of the name/address that you wish to edit.
c) Click on the name once to highlight it, then click the “Details/Edit” button on the right side of the screen.
d) Click on the “Name” button, and retype in the name you want to edit. Use the “backspace” key to delete characters, or use the arrow keys to tab over existing characters. When done, click “OK”
e) Use the same process to edit the email address as necessary.
f) On “email” screen, click OK when edits are complete to return to “Register Destinations” page.
g) If no more edits are required, click the “close” button to return to the address book.
h) Click “OK” to return to the “Scan and send” page.
7) To delete an existing name/address:
a) Follow steps 1-4 above.
b) On the “Register/Edit” page, select the letter group of the name/address that you wish to delete.
c) Click on the name once to highlight it, then click the “Delete” button on the right side of the screen.
d) A pop-up screen will ask you if you’re sure you want to delete this entry. Answer yes. Verify the entry has been deleted from the address book.
e) If no more deletions are required, click the “close” button to return to the address book.
f) Click “OK” to return to the “Scan and send” page.
How do I edit the address book on my RICOH device?
As employees come and go, you will find it necessary to edit the address book on your Ricoh device. Editing the address book all newer Ricoh devices is easy. (If the following directions don’t work on your device, please consult your owner’s manual.)
1) If your model has a “Home” button, begin by clicking it. If your model does NOT have a “home” button, then follow these steps before proceeding”
a) Select the “User Tools” button to the right of the screen and select “System Settings” from the screen options.
b) Select the “Administrator Tools” tab.
c) Select “Address Book Management” from the screen options, and proceed to step 4 below.
2) Find the “User Tools” button to the right of the screen. (NOTE: on some models, the button is labeled “User Tools/Counter”.) Click it.
3) Select “Address Book Management” from the screen options.
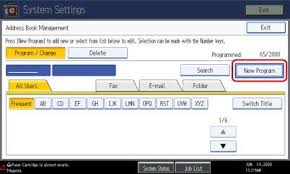
a) From the “address book management” page, select the “New program” button.
b) Find the “Change” button below the name field and press it.
c) Type in the person’s name using the onscreen keyboard, and then select “OK” at the top of the screen.
d) You will notice that the “Key Display” field is the same as the “Name” field. “Key Display” is how the name is to be displayed in the address book. If it’s fine, leave it as is, otherwise edit the “Key Display” field by clicking “Change” underneath the “Key Display” field and editing it.
e) Select the “Email” button at the top of the screen.
f) Edit the email as necessary (using the “Change” button again”) and select the “OK” button when complete.
g) Click “OK” again to return to the address book management page.

5) To edit an existing name/address:
a) Follow steps 1-3 above.
b) From the “address book management” page, select the name of the person whose name or address you wish to edit, using the alphabetical list at the bottom of the screen to locate the name.
c) Click on the name of the individual to pull up the edit screen.
d) Using the “Change” button under the “Name” and “Key Display” fields, edit those as necessary. Make use of the arrow and backspace buttons to make your specific changes. Click “OK at the top of the screen when done.
e) Click “Email” at the top of the screen to edit it. Use the “Change” button to pull up the email edit screen, and click “OK” when done.
f) Select “OK” again to return to the address book management page.
a) Follow steps 1-3 above.
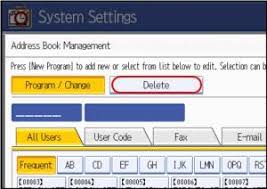
b) On the “Address Book Management” page, select the “Delete” button.
c) Using the alphabetical listings, locate the name that you wish to delete.
d) Select the specific name you wish to delete.
e) A new “Are you sure….” Screen will pop up. Select “yes”.

7) From the “Address Book Management” screen, click on the “Exit” button at the top of the screen to the “User Tools” screen, and then “Exit” again to return to the main menu.
Why are there lines on my print/copy?
If the lines are happening on copies (a physical page that you are copying at the machine) – please ensure the scan/copy glass is clean (see below). Some devices have multiple scanners and glass – there are labels on the top that will direct you to those areas. If there are lines on prints (sent from a computer from a Word, Excel, PDF), in most cases you will need to call a technician.
Cleaning the glass

The two things we recommend for cleaning glass are a non-astringent, ammonia-free glass cleaner (which you should be able to find wherever you buy cleaning products), and a soft, lint-free cleaning towel. DO NOT use paper towels of any other type of pulped paper product.
Apply cleaner to the cleaning towel, not directly onto the glass. Wipe the entire glass surface with the dampened towel (don’t forget the corners), until the glass is free of dirt and smudges. Wipe the Document Feeder Scan area on the far left side of the glass (see image). Wipe in one direction along the divider strip. Using a separate, dry, cleaning towel and wipe away any cleaner residue.
Finally, always keep the lid of your copier closed in order to protect the copier glass.
Why is my paper jamming or coming out wrinkled?
Your paper tray should never be filled to capacity. You should always leave some space. You should always fan the stack of paper that you’re about to put in the input tray. This is done to loosen any sheets that may be stuck together. Drawing in multiple sheets can make the printer think that the sheet is longer than it is supposed to be.
Always be sure to adjust the paper setting on the control panel to match the weight and kind of paper that you’re loading. The device needs to know what kind of paper you’re feeding into it in order to operate as expected.
If you’re confident that you’ve loaded the paper correctly, and have calibrated the device to accept the paper you plan to use and pages are still jamming or coming out damaged, then you should contact us immediately for a service call.
Don't see your question here?